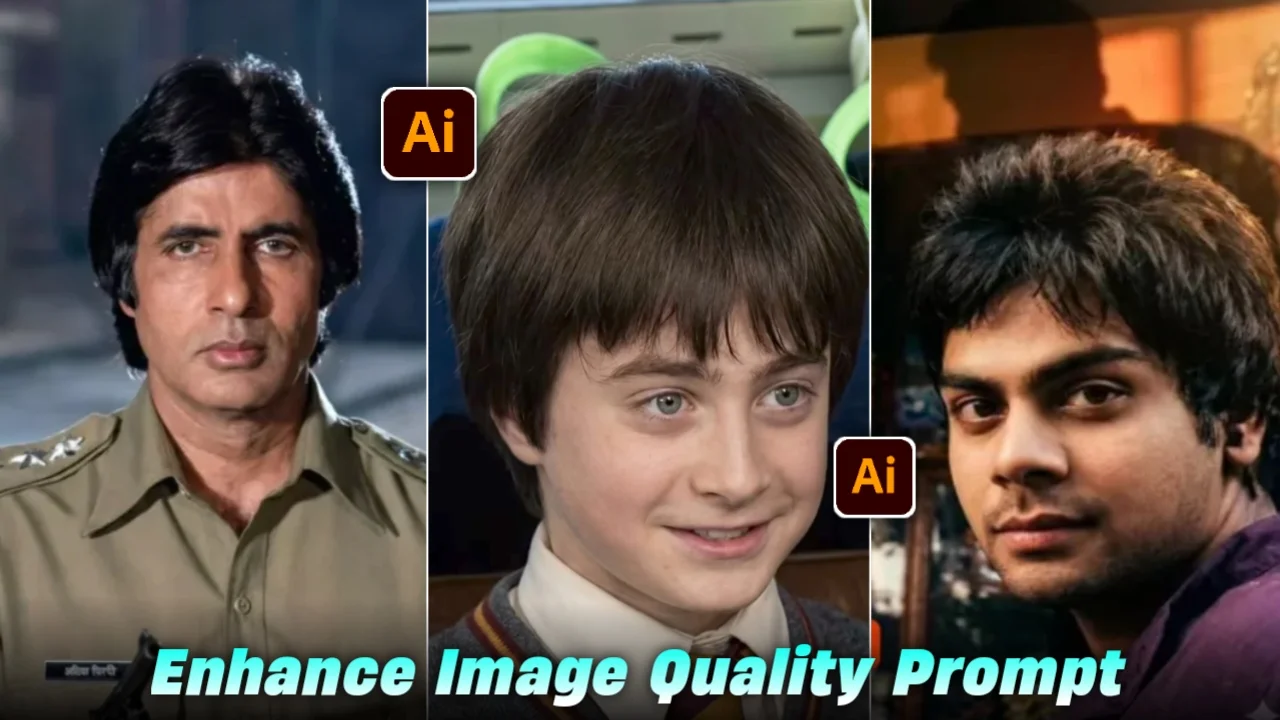
Old photos have their own charm, right? But the problem is, most of them are blurry, low quality, or faded with time. Sometimes you really want to bring those memories back in clear, sharp quality. And this is where AI photo editing comes in.
These days, people are using AI prompts to enhance image quality to 4K. It sounds a bit technical, but honestly, it’s not that complicated. Even normal users are doing it with simple text prompts.
I have seen that many people try this just for fun, and then they get surprised when old family photos suddenly look fresh and clear again.
What Does 4K Image Enhancement Actually Mean?
In simple words, 4K enhancement means improving a photo so it looks super sharp and detailed. Like, you can see faces clearly, textures are improved, and the image feels modern.
Old blurry photo → AI improves it → Clean, sharp 4K-like image
AI tools don’t just “zoom” the picture. They actually try to rebuild missing details. For example:
- Fix blurry faces
- Improve colors
- Remove noise/grain
- Sharpen edges
- Restore damaged parts
Sometimes it doesn’t work perfectly, and that’s okay. AI still tries its best based on the information it has.
Restore this blurry photo to sharp, high-resolution clarity. Enhance facial features, improve lighting, and bring out background details without changing the original look“Sharpen the textures in this image—skin, hair, clothing—and resolve the blur in the subject’s face. Make it crisp and clear, like a professional portrait.”Don't change anything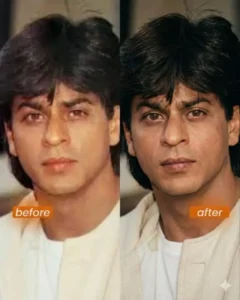
Enhance the portrait while strictly preserving the subject’s identity with accurate facial geometry. Do not change their expression or face shape. Only allow subtle feature cleanup without altering who they are. Keep the same background from the reference image. No replacements, no changes, no new objects, no layout shifts. The environment must look identical. The image must be recreated as if it were shot on a Sony A1, using an 85mm f1.4 lens, at f1.6, ISO 100, 1/200 shutter speed, cinematic shallow depth of field, perfect facial focus, and an editorial-neutral color profile. This Sony A1 + 85mm f1.4 setup is mandatory. The final image must clearly look like premium full-frame Sony A1 quality. Lighting must match the exact direction, angle, and mood of the reference photo. Upgrade the lighting into a cinematic, subject-focused style: soft directional light, warm highlights, cool shadows, deeper contrast, expanded dynamic range, micro-contrast boost, smooth gradations, and zero harsh shadows. Maintain neutral premium color tone, cinematic contrast curve, natural saturation, real skin texture (not plastic), and subtle film grain. No fake glow, no runway lighting, no oversmoothing.Render in 4K resolution, 10-bit color, cinematic editorial style, premium clarity, portrait crop, and keep the original environmental vibe untouched. Re-render the subject with improved realism, depth, texture, and lighting while keeping identity and background fully preserved. NEGATIVE INSTRUCTIONS: No new background. No background change. No overly dramatic lighting. No face morphing.No fake glow. No flat lighting. No over-smooth skin.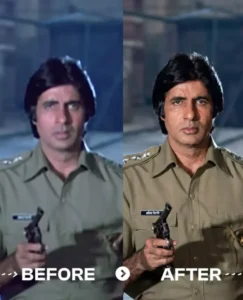
Transform the source image by applying a dramatic, warm cinematic aesthetic typical of high-end music videos. Crucially, the lighting must feature a strong, warm backlight (rim light) originating from behind the subject, creating a glowing golden halo on their hair and shoulders that separates them from the background, while also ensuring ample, soft frontal light on the subject’s face so that facial features are clearly and evenly illuminated. The overall atmosphere should be emotional and moody with a shallow depth of field (blurred background), dominated by rich amber, gold, and deep shadow tones, precisely maintaining the original subject’s facial features, pose, outfits, background, and gender 100% accurate. Perform a realistic upscale, bringing the subject into extremely sharp focus with enhanced skin texture and detail, styled as bright daytime photography with natural outdoor ambient light retained in the scene and sufficient key light on the face for a well-exposed portrait.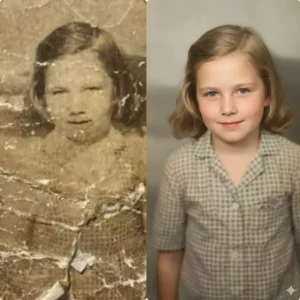
Create an ultra-realistic 8K restored version of an old, damaged photograph. The image should retain the original person’s identity and features but be enhanced with lifelike skin texture, sharp facial details, and natural lighting. Remove scratches, stains, and blur while preserving authenticity. The colors should be soft, balanced, and natural—reviving faded tones into a rich, full-color look. Add depth, contrast, and gentle shadows to create a vibrant yet realistic restored portrait with DSLR-quality clarity and detail.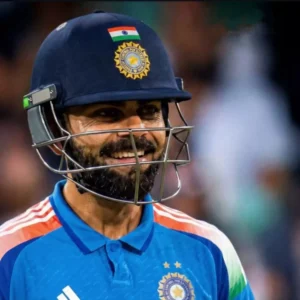
ΤΟ MAKE ANY BLURRY PHOTO 4K USE THIS PROMPT ( MAKE SURE TO ADD PLAYER NAME):- “UPSCALE THE UPLOADED MATCH PHOTO OF (PLAYER NAME) TO 2K RESOLUTION CINEMATIC QUALITY IN THE SAME ASPECT RATIO WHILE PRESERVING THE ORIGINAL SUBJECT, POSE, PROPORTIONS, AND BACKGROUND EXACTLY AS CAPTURED. IF THE IMAGE IS SOFT OR MOTION-BLURRED, FULLY DEBLUR AND RECONSTRUCT FINE DETAILS WITH CLARITY, AVOIDING ARTIFICIAL SHARPENING OR HALLUCINATED TEXTURES. ENHANCE CINEMATIC MATCH LIGHTING WITH STRONG STADIUM FLOODLIGHTS CREATING CRISP HIGHLIGHTS ON THE ATHLETE’S FACE, ARMS, AND JERSEY, EMPHASIZING SWEAT, SKIN TEXTURE, AND FABRIC WRINKLES WHILE GIVING SLIGHT VIGNETTE. PRESERVE DEEP SHADOWS FOR DRAMATIC CONTRAST WHILE MAINTAINING ACCURATE EXPOSURE AND DYNAMIC RANGE. RETAIN THE LIGHT FALLOFF, ATMOSPHERIC GRAIN FOR AN AUTHENTIC IN-GAME MOMENT, THE ORIGINAL CAMERA ANGLE, FRAMING, AND ATMOSPHERIC MOOD. HARD RULE: DO NOT CHANGE THE SUBJECT’S FACIAL STRUCTURE, HAIRSTYLE, OUTFIT, BODY SHAPE, CAMERA ANGLE, POSTURE, BACKGROUND ELEMENTS, OR COMPOSITION.”How AI Photo Editing Prompts Help in Restoration
Now here is the interesting part. Instead of manually editing, you just write a prompt. A prompt is basically a simple instruction for AI.
For example, you tell the AI:
“Enhance this old photo, restore face details, make it 4K quality, natural lighting, high clarity”
And the AI tries to follow it.
Many people don’t know this, but the quality of your prompt really matters. A better prompt means better results.
Simple Steps to Enhance Image to 4K Using AI Prompts
Let’s keep it super simple. You don’t need editing skills at all.
Step 1: Choose Your Photo
Pick an old or low-quality image. It can be:
- Family photo
- Childhood picture
- Blurry portrait
- Old printed scan
Step 2: Upload to AI Tool
Use any AI photo enhancer or editor tool that supports prompts.
Step 3: Write a Clear Prompt
This is the most important part. You can use something like:
“Restore this old photo, enhance to 4K quality, improve face details, remove blur, natural skin tone, sharp focus, cinematic lighting”
Simple and clear words work best.
Step 4: Generate Result
Wait for a few seconds. The AI will process and give you an improved version.
Step 5: Compare and Adjust
Sometimes the result is good, sometimes not perfect. You can slightly change the prompt and try again.
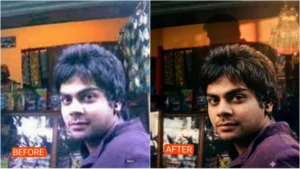
The AI will use this photo to enhance its quality.
Step 4: Copy the AI Prompt
Next, copy the image enhancement prompt provided in the article. These prompts help the AI understand how to improve your photo.
Step 5: Paste the Prompt
Now paste the copied prompt into the text input box of the AI tool.
Step 6: Generate the Image
After pasting the prompt, click the Send or Generate button. The AI will start processing your image and improving its quality.
Step 7: Download the Enhanced Photo
Within a few seconds, your high-quality enhanced image will be ready. Click on the image and download it to your device.
Real-Life Tips (From Experience Style)
I have noticed something while using these tools. The results depend a lot on how you describe the image.
For example:
- If you just say “enhance image”, results are average
- If you describe details like “sharp face, natural light, 4K clarity”, results improve a lot
Also, don’t expect magic every time. Some very damaged photos may still look a bit artificial after restoration. But still, it’s way better than the original.
Another thing, AI sometimes over-sharpens faces. So you might need to try 2–3 times to get a balanced result.
Common Mistakes People Make
Many beginners do small mistakes without knowing:
- Using very short prompts
- Not mentioning “4K” or “high resolution”
- Expecting perfect output in first try
- Uploading extremely low-quality images (too damaged)
If you avoid these mistakes, your results will improve a lot.
Why This Trend Is Getting So Popular
People love memories. Old photos bring emotions. And when AI makes them clear again, it feels kind of magical.
Also:
- No Photoshop needed
- Fast results
- Easy for beginners
- Works on mobile too
That’s why so many people are trying it now.
A Small Honest Opinion
Sometimes AI works really well, sometimes it slightly misses details. But still, it’s impressive how it can bring old memories back to life.
I think it’s more like a “helper tool” than a perfect editor. You still need to try different prompts to get the best result.
FAQs
1. Can AI really turn old photos into 4K quality?
Yes, AI can improve quality and make images look like 4K, but results depend on the original photo.
2. Do I need editing skills for this?
No, you just need to write simple prompts. No professional skills required.
3. Why does the result change every time?
Because AI generates results based on prompts and image condition, so each try can look slightly different.